Showing posts with label original art. Show all posts

Friday, April 1, 2011

Father's Heart Quilt

~ sketch and calculate ~


~machine pieceing ~

~ center panel tree ~

~ freehand machine quilting ~


~ straight grain quarter inch binding ~
~ label and hanging sleeve on back ~

~ quilt getting raffled tonight ~

Friends of mine are putting on a talent show and raffle to raise money to benefit Father's Heart Foundation please follow link to learn more about the plans to build family-modeled, sustainable orphanages in El Salvador.

Wednesday, March 2, 2011

A Proper Tea Party

Some of you may recall that I, my nieces, and nephew have been quilting our way through American History. They've been learning a little about sewing and a lot about our country's past by making quilt blocks with their aunt.

Friday when they arrived little Emma (she's 3) wanted to have a tea party. We often have tea parties when I babysit, they help me make chocolate chip scones and then gather round the coffee table for peppermint tea and scones. However, there wasn't time for quilting and a tea party... but there was a compromise: She could make a quilt block about the Boston Tea Party. She was delighted.

In American history the colonists in Boston threw a shipment of tea from England into the Boston harbor in protest over the high taxes they were being forced to pay the crown. In fabric crayon terms that means a whole lot of blue scribbling to represent the water to start with.

Next an orange crayon was selected. "I think this is the colour the tea cups were" she said.


Well obviously, for it to be a tea party you'd need tea cups. That just makes sense.

Tuesday, September 21, 2010

Returning

Suspended here, my hand
has the memory of flying,

of curving, arching on air.
My palm tingles, drawn back

inside the car. I reach back
into the buffeting wind,

the invisible resistance,
the heavy push – uplift.

Pivot from the elbow.
The sweeping movement,

tilt, turn, glide, tilt back,
the slow aerial infinity,

this memory of freedom.
It is possible

to echo the motions,
even now.

Wednesday, June 30, 2010

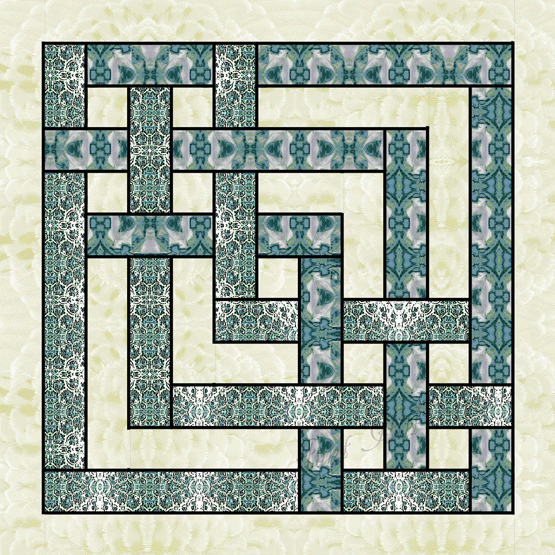
Carpenter's Squares

Graphic of quilt design for the quilt class I'm teaching in August:


~Carpenter's Squares Infant Quilt ~


From the class description:
The woven bands of the Carpenter’s Squares create a high graphic design with a modern, a classic, even a Celtic appeal which looks difficult to do, but really isn’t. Once you know the secret of creating consistent T-seams this infant quilt top becomes so simple, beginning quilters can confidently piece it. More experienced quilters will also find this quilt top an excellent opportunity to practice “pinless seaming” a speed construction technique using very few pins.
The "sample quilt" made up to help advertise the class:

Monday, April 19, 2010

Looking Back

A milestone in the blogging world, the 500th blog post offers a chance to look back over the accumulated postings and realize how far we have travelled together.
At first I thought I might let it pass without comment. Then again...

... a montage of photos from posts over these last two years might be just the thing to mark my 500th post.

Also, I just realized I actually have followers. And none of you are related to me! Thank you. I have no idea how anyone managed to figure out following when I didn't have a button up (I've put one up now) but I am delighted you did.

Thursday, March 19, 2009

Red Winged Book Bird

Re-visiting old projects (in other words, going through old boxes) I found:

An easy scrap quilt with a bonus. This is my Red-Winged Book Bird Quilt. Using all my leftover red fabrics and scraps, I made "book" blocks from five rectangles (2.5"x10.5" each) to make the 10 inch blocks and sashed my red books with a black batik. But I didn't stop there. Do you see? Down in the bottom right corner of the quilt is a red-winged blackbird.


Stuffed machine applique on the unfinished quilt top, this attempt at a red-wing blackbird crooning over a cattail was inspired by an old favorite PBS show Book Bird, and the fact that while I was making the blocks for this quilt I was listening to Where the Red-Winged Blackbirds Sing. It's completely obvious I drew my template from looking at the woodblock print cover art of Jim Schulz's CD.

Monday, March 2, 2009

Piece of Yarn: Alpaca Test Puppet

I'm knitting again and although I haven't got photos of that project yet (it's very much in the "what is that going to be?" stage still) I thought I'd show you something from the same yarn. This is my first time using alpaca yarn for a project and I must say I love knitting with this soft fiber. Before I started though, I wanted to see how this Alpaca fingerling I had from Frog Tree (type 2310, color#0012) would knit up on a 2.5 size needle. But doing another gauge test swatch? Ugg. Introducing my gauge swatch bunny finger puppet.
I cast on my set number of stitches, did a raised, purl on right side row (to mark for measuring gauge later), did stocking knit for my set number of rows, purled on the right side again (marking end of counted rows for easy measuring) and knit a bit more before splitting for the ears. I did a half row back and forth reducing, and when I got down to one stitch I crochet stitched down the inside of the ear back to the other half of the row and picked up the other ear. Then I added eyes and nose, stuffed his head with scraps of yarn, and seamed him shut up the back.
A little bit more white wool scrap, untwisted for whiskers and completely unspun to a bit of fluff for the tail and the rabbit was finished.
He's already been claimed, and taken away to play with another larger puppet who "needed a pet."

Friday, February 6, 2009

Free Desktop Photo with Psalm

I've been editing photos in Photoshop again.
Every time I looked at this one photo of the sun setting behind the mountain, I kept thinking of one of my favorite Psalms. I will lift up mine eyes unto the hills... Psalm 121
So I put the words (KJV) together with my photo to make a desktop or add to a slideshow screen-saver. If you click on the photo here it should open an extra-large format, and you are welcome to save and use for your own desktops or screen-savers.

Saturday, January 17, 2009

Creating Cardinals -- Quilt Templates

In our For the Birds Sampler Series most of the blocks are pieced, but I thought some folk art applique Cardinals might be fun and complement the blocks we've been making. Lately, I've just been in the mood to make some "pluffy" fat Cardinals. So I made up some bird templates using card stock I had on hand.

You can do this too. I'll walk you through it; it's not hard.

You need:


  • Your template material -- I used card stock but you could use anything from Mylar to copy paper to basswood.
  • A pen or some sort of marking implement that works with your template material.
  • A pair of scissors or something to cut your template out with.
  • Straight edged ruler (I mostly used my rotary cutting ruler).
  • Something round -- I used a water bottle here, but I've also used the jar lid of a scented candle, a bowl, and a canister of hand salve. Anything round will work as long as it's the right size to be the body of the bird.


Trace your round thing in the center of your paper. Line the ruler up on the side that will become the bird's back and draw a straight line. I take advantage of the 45 degree angle on the corner of the ruler to get the feel of the peak of the birds head. This helps me estimate the height of the head and get the length of the line correct. You will need to draw another line from what becomes the chest of the bird to the tip of the head -- Cardinals don't have 45 degree heads.
Another line from the bottom of the bird out, helps to define the dimensions of the tail (in this case a downward tail) and then you can smooth out the shape of the bird.
Add a beak (and an eye just for looks) and cut out your template.
All that remains is to trace the template onto the fabric and applique your bird onto a quilt square. I keep the beak on the main template so that it doesn't get lost ( it's such a small piece) but you will use a different fabric and cut the beak separately when making it up.

Remember when cutting out your fabric, if you are doing needle turn applique you will need to add a seam allowance. If you are doing raw edge applique you can cut out on the lines you trace around your template.
You can also create an upward facing tail on the template as shown in the photo below. Simply add a rectangle at the lower end of the line that makes the back of the bird, and shift the bottom line to connect.
This tufted-head bird template done in reds will be Cardinals, and since my For the Birds sampler has been in reds, browns, and golds I have been calling it a Cardinal. However, there are other birds with similar head shapes, the Tufted Titmouse, Woodpeckers, Quail, and Blue Jays. Blue Jays would be an excellent choice for a sampler done in shades of blue.

Monday, September 29, 2008

Drawing Trees

I've been drawing these trees for years now; I used to doodle them on note paper in classrooms. Oddly, these trees are one of the very things I sketch with confidence, which probably explains why I draw so many of them. For this one I'm using a Micron Pigma pen in green and some white Kona cotton. Yup, I'm drawing them on fabric now. :-)

Saturday, September 27, 2008

Stained Glass Leaves

Did you ever do this as a child? Did you make waxed paper and leaves "stained glass" to hang in your windows?

These maple leaves reminded me... I gathered them, cut off all their stems (well, all except that one) and layered them on wax paper. I suppose technically I gathered them, asked if we had any waxed paper, went to the store and bought waxed paper, and then cut off their stems and laid the leaves on a sheet of waxed paper.
Then put another layer over top of the leaves.
Lay a cloth over and with the iron on it's highest setting.
The heat melts the wax and bonds together trapping the leaves between layers.
Make several. Hang them in your windows. Look at the sunlight comming through, and be a child again for a little while.

Friday, August 22, 2008

Pieces of Paper: Snowflakes

I know it's not winter yet, but I'm making snowflakes anyway. I made some for a friend once and twenty years later her mother still has them -- she laminated them and hangs them in her windows for the holidays. I just make new ones every year.


Frost Crystal Style

I really like how they look against my blue file folder. Last Christmas we backed them with black card stock for a more dramatic look. I don't know about real snowflakes, but no two of mine have ever turned out the same, and I've made hundreds over the years.

Classic Style

I was thinking of making some using acid free papers, and framing them for sale. What do you think?

Victorian Style


Would you rather make your own?

Fold your paper diagonally and trim off the long edge (or start with a square piece of paper).

Fold in half and in half again, into eighths, triangularly. Trim off the long corner (if you opened it now you'd want to see a rough circle).
On the CUT edge begin the shape of the snowflake, cutting it so you create points.
Then begin to hollow out the snowflake. Working from the outside edges towards the center cut varying shapes -- be sure to leave areas of the folds for connecting the parts of the snowflake. Try to leave more "negative space" than paper for a lacier effect.
When you have finished cutting, unfold the paper carefully.
I didn't do this before taking the photos, but you can press lightly with a cool iron to remove the fold lines for a flatter, smoother flake.

Thursday, August 7, 2008

Eight Examples of Nine-Patch Quilts

"Just Ducky"

"Leaf Pile"

"Humble Stripey"

"Sweet Pea"

"Calla Co Quilt"

"Cathedral Baby"

"Log Cabin Nine Patch"

"Black and White and Red Rabbit"

"1929-patch"