Showing posts with label baby quilts. Show all posts

Wednesday, June 30, 2010

Carpenter's Squares

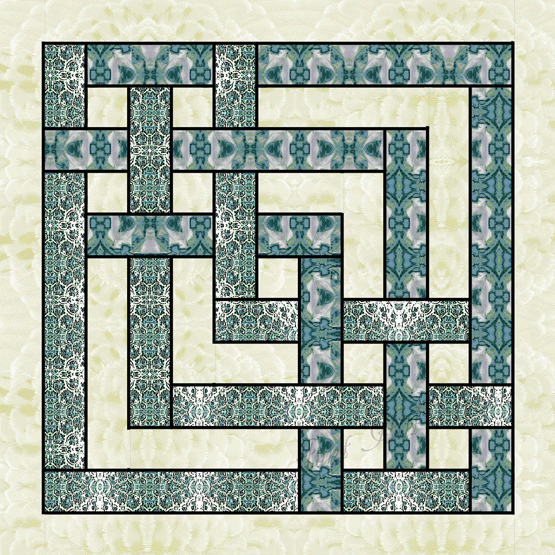
Graphic of quilt design for the quilt class I'm teaching in August:


~Carpenter's Squares Infant Quilt ~


From the class description:
The woven bands of the Carpenter’s Squares create a high graphic design with a modern, a classic, even a Celtic appeal which looks difficult to do, but really isn’t. Once you know the secret of creating consistent T-seams this infant quilt top becomes so simple, beginning quilters can confidently piece it. More experienced quilters will also find this quilt top an excellent opportunity to practice “pinless seaming” a speed construction technique using very few pins.
The "sample quilt" made up to help advertise the class:

Monday, February 22, 2010

Currently Quilting

I pulled this baby quilt out of storage to quilt for the new little one on its way. My grandmother and I, before her death, created many quilt tops together as a legacy from her to future grandbabies. This quilt was one of her favorites because of her Scottish love for all things thistle.

For those who want to know: The dark spiky and thistle-y print is "Camelot" from Hoffman. The light print is a Maywood Studios "Beautiful Backgrounds" with pale green dragonflies and grasses dancing across it. And the stems and leaves of the appliqued thistles are done with a varigated Sulkey rayon thread.

Saturday, February 21, 2009

1929patch

One thing we can learn from the fabrics of the Great Depression: Although all was bleak around them, many people chose to be happy anyway. The bright cheerful colors and whimsical designs of 1930s fabric reminds me not to look at the Black Fridays (like in 1929 when the stock market crashed) but to focus instead on the things that are still good in life. The happiness of welcoming a new life into the world, the laughter of children, the dearness of friends and family, the faithfulness of God in dark times. These are all bright spots, cheerful colors in the patchwork of our lives.

Friday, January 23, 2009

A Finished Quilt

I know I post a lot of UFOs (un-finished objects)... but I do actually complete some of them.
As an example: Hunter's Star Baby Quilt.45" square, machine pieced, hand quilted, brushed flannel backing, back to front self binding. The dark green is a pine branch patterned batik, and the yellows are "scrappy" using 7 different prints in a close range of shades, to make the eye dance over the quilt.
Hunter's Star blocks offer the delight of the eight pointed star without the frustration of Y seams at the intersection of every diamond. Fun to make and, as usual, easier than it looks. :D

Friday, September 5, 2008

Starter Quilt Simple Project: Step Four

Time to add the Border:
In step two we cut some pieces that we didn't use in step three; we'll use those now.

Put together four strips as follows:

a 15.5 inch (by3.5 inch) striped (fabric A) bar
then a 3.5 inch square of fabric E
a 3.5 inch square of fabric C
another 3.5" square of E
and second 15.5" x 3.5" bar of your stripe (A)

Two of those can be pinned and sewn onto the top now (remember to nestle your seams whenever possible and press accordingly). The other two will get a 3.5 inch square of fabric B sewn on each end.

And then they'll get sewn on.
And there's our 45 inch square baby quilt.

Remember that Michael Miller yellow stripe I used to demonstrate how to cut your stripes in step two? Well, I used it to make a very similar project. Same 3.5" squares, and width on our stripes, the finished top still measures 45"square and the layout is basically the same.

What changed? Our 9.5 inch blocks became "snowball" blocks, and instead of solid 3.5 inch squares in the border I opted for half square triangles. Oh, and in case you missed this, I didn't use the same fabric. ;-)

I'll demonstrate half square triangles in the next Building Blocks, and snowballs later. Then we'll take a look at battings (aka wadding) and super easy finishing techniques. For those of you interested in something a little more complicated I'm also planning some different 9.5 inch blocks that we can insert into this layout, and when we get to finishing that "sampler quilt" I'll be looking at hand quilting patterns and methods.

Sound's like we're going to be busy for quite a while.

Thursday, September 4, 2008

Starter Quilt Simple Project: Step Three

My sewing machine is back from the shop, which means two things I'm sewing up a storm and we can carry on with our simple pink "mystery" project. The yardage and cutting instructions are listed in step two. So let's get sewing.


Whenever possible "chain stitch" your pieces. It keeps the thread from snarling and I find it's just a faster method.
So begin with your 9.5 inch blocks -- all nine of them. Sew one 9.5 inch by 3.5 inch rectangles of your striped fabric to each one.
Remember to press each seam as you go along and for this quilt press towards the stripe.
We're making three rows which should look like this:

Row 1) stripe, square of fabric C, stripe, square of fabric D, stripe, square of fabric C, stripe

Row 2) stripe, square of fabric D, stripe, square of fabric C, stripe, square of fabric D, stripe

Row 3) stripe, square of fabric C, stripe, square of fabric D, stripe, square of fabric C, stripe

Tada. Okay, next up are our cornerstone rows.

We'll be using our 3.5 inch squares of fabric B (those are our cornerstones) and the 9.5 inch by 3.5 inch bars of our stripe (that was fabric A by the way). Sew a square to each bar.
We're making four identical rows: square B, stripe, square B, stripe, square B, stripe, square B.

Here you can see the process part way. I've laid it out with the completed first three rows so you can see where we're going.


Once you have those four rows sewn, you can begin to sew those rows to the first three rows.
Now you'll see why we've been pressing towards the stripe. See where I drew in arrows on the picture? The rows are layered right sides together and the seams should but up against each other nicely, if it's not exact pin them nestled together anyway -- it will give you nice crisp corners. (Note: you can ease in a smidge of fullness but if it's really badly off you may want to undo the seam and resew with an eye towards perfecting your seam allowances -- they do matter.)

Once you have those seven rows all sewn together you have the body of the quilt.

As you can see this is shaping up to be a really simple quilt top... but it doesn't have to be. Here you can see that I took my Micron pen and traced an embroidery pattern in the center of my cream blocks -- if I had the patience I could embroider it. (I don't.)
And of course you can always substitute pieced blocks where this project uses solid 9.5 inch squares. I've got a couple examples of 9.5 inch pieced blocks coming up in future Building Blocks posts, so "stay tuned."

Oh, and we' ll add the border next time. You were wondering what those extra pieces we cut in step two were for, weren't you. Well, go on to step four.

Wednesday, August 27, 2008

Starter Quilt Simple Project: Step Two

We talked about fabric selection in step one, now we're ready to talk yardage and cutting. For those of you who object to doing mystery quilts, just wait until all the posts are up. Those of you who love adventures and prefer to look at the work one tiny step at a time... begin now. I will clue you that this is a really easy square baby quilt or wall hanging.

Yardage. Whenever possible buy more than you need -- not more than you can afford -- but enought to buffer if you make a mistake in cutting. I prefer having a quarter or half yard left over to having to go back to the store and not be able to find more of the fabric I need to finish my quilt. That said, in the following measurments, I've cut it close with a couple of them so if the yardage has an asterisk (*) beside it you may want to buy a little more than I list.


Fabric:

A) Stripe -- one and a third (1.33) yards*
B) Accent #1 -- quarter (.25) yard*
C) Main Block -- two thirds (.667) yard
D) Contrast Block -- half (.5) yard
E) Accent #2 (could be the same as D) -- quarter (.25) yard (or scrap)

We will cut our pieces for the whole project.


A) Cut eight (8) pieces 3.5 inches by 15.5 inches and twenty-four (24) pieces 3.5 inches by 9.5 inches. This is your stripe, you can cut across the stripe or lengthways (I'll demonstrate in a sec.)


B) Cut twenty (20) 3.5 inch squares. (This could be fussy cut -- I demonstrate that in another post.)

C) Cut five (5) 9.5 inch squares

C) Cut four (4) 3.5 inch

D) Cut four (4) 9.5 inch squares.

E) Cut eight (8) 3.5 inch squares. (could be same fabric as D)


Now, for the stripes:
You can cut the stripes sideways, like so:

Or you can cut the stripes longwise, which I will demonstrate in a Michael Miller yellow stripe, because that's what I have step by step photos in.
You will have some "waste" but I have another project that we can use leftovers for, so save them.

For a 3.5" strip you need to find your "center" line and line it up with the 1.75 inch mark on your ruler. Make your first lengthwise cut.
Your second cut will trim the extra, making the piece 3.5 inches wide.

If you have selected a stripe wider than 3.5 inches or with a repeat that is several inches apart, you will have more waste and will need extra yardage to use the stripe lengthwise.

You can also mix your cuts.... I am cutting my strawberries across the stripe for the 9.5 inch pieces and with the stripe for my 15.5 inch pieces. Something to keep in mind with wider or more varied striped fabrics:
Isolating the strawberry stripe for those eight 15.5 inch pieces meant getting extra fabric. There are only five strawberry stripes across the width which means I needed 1.75 yards (I bought 2) in order to get the pieces I wanted in the directions I wanted them. There's alot left over but like I said, I've already got a project in mind for the future that will use leftover stripes. Actually, I think the leftovers project is even more fun that the original... But I'm getting ahead of myself let's finish this project first. On to Step Three.